
Creating a free blog is the first step in establishing your online identity. A blog website allows you to write anything or showcase your creative skills and build a strong community around them.
Starting a blog doesn’t have to cost anything. Blogger, owned by Google, lets you publish your ideas for free. You only need a Google account and a few minutes to set things up.
For new bloggers, this platform removes the barriers that usually come with hosting and domain costs. You can start sharing your stories, tips, or tutorials without worrying about technical setup. The best part? A Blogger site can grow into more than just a personal journal. With the right approach, it can generate real income.
People worldwide use Blogger to write about food, travel, finance, lifestyle, and more. Many earn through AdSense, affiliate links, sponsored posts, or digital products. If your blog attracts readers, you have multiple ways to turn traffic into money.
Today, we’ll tell you how to create a blog on Google Blogger and make money from it.
Why Blogger?
Blogger is one of the easiest platforms to start with. It’s free, beginner-friendly, and managed by Google. That means your blog runs on reliable servers without any hosting costs.
You don’t need technical skills to set it up. The dashboard is simple; creating posts feels like typing in Google Docs. You can publish content in minutes. Blogger also connects with other Google tools like Analytics, Search Console, and AdSense. This makes it easier to track your growth and earn from ads.
For customization, Blogger offers a variety of themes. You can tweak colors, layouts, and fonts to match your style. While it may not be as flexible as WordPress, it has enough options for most beginners.
Another reason to choose Blogger is the quick approval for AdSense. Since Google owns it, integration is smooth. This allows you to start monetizing sooner compared to some other platforms.
In short, Blogger is ideal if you want to start blogging without costs or complications. It lets you focus on writing and growing your audience, while the platform takes care of the technical side.
Advantages of creating a free blog on Blogger:
Creating a free blog on Blogger (Step-by-Step Guide)
Starting a blog on Blogger takes only a few steps. Here’s how you can do it:
1. Sign in with Google
Go to Blogger.com and log in using your Google account. If you don’t have one, create it first.
2. Enter a name for your blog
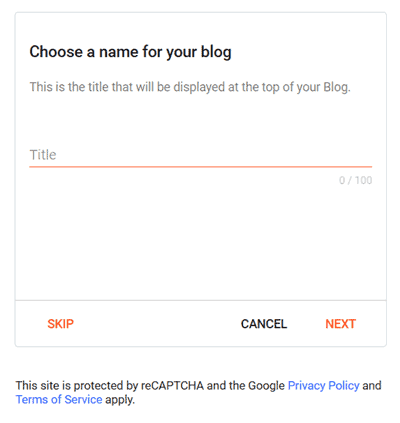
You will get an option to enter a title for your blog (eg. BloggingTriggers). Enter a name of your choice and click on Next.
3. Choose a Blog Address (URL)
Type in your blog address. It will appear like this: example.blogspot.com. However, you can replace it later with a custom domain (example.com) through settings.
As you enter the name, Blogger will check availability. If your choice is taken, try a variation until you find a free one.
4. Set a display name
Next, enter your display name. For instance, my real first name ‘Manoj’ will appear for all my blog posts. Similarly, you can show your real name or a pen name in blog posts.
Click on Finish. Blogger will process your request and automatically redirect you to the dashboard in moments.
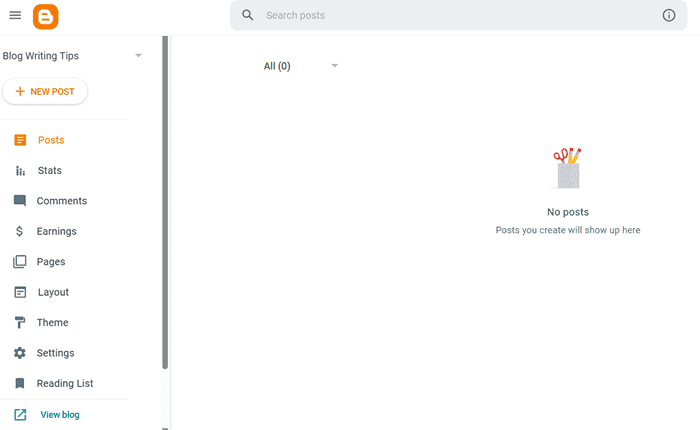
5. Select a Theme
Pick a theme from the available options. Visit Theme from the left sidebar and choose a theme from the main screen.
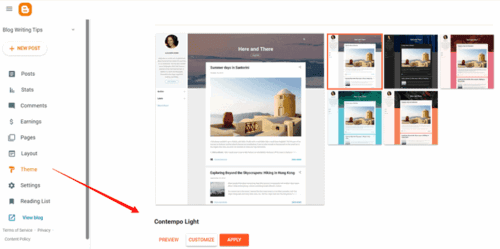
You can change it later, so don’t worry about perfection now. Click on Preview to see how it will appear on your blog. Click Customize to change default color, background, font type, and others on the new theme.
Hit the Apply button to apply changes.
6. Start Writing
Click on “New Post” to compose your first blog post. Add a title, write your content, insert images, and hit publish.

Format texts using the toolbar menu. It includes options to change font size, assign colors, add hyperlinks, upload media files, align paragraphs, and others.
7. Adjust Basic Settings
When you finished, move to the right pane of your screen.
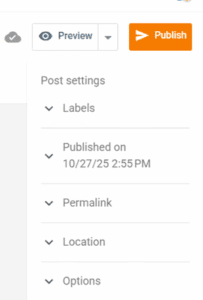
Set labels and customize permalinks for your blog post here. If you want to schedule the content for later, choose a date and time to publish. Blogger will automatically publish it at the chosen time.
You can also set a location and disable comments on the same section.
Finally, hit the Preview button to see a preview of your post. If satisfied, click on publish.
Congrats. Your first blog post has been published. Share it on your social media accounts to let others know about your new venture and increase the traffic.
How to Manage Blogger Posts
Visit your Blogger dashboard to manage your blog and posts.
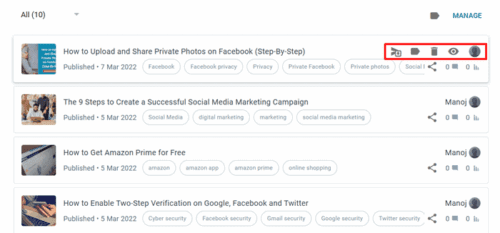
A user can create up to 100 free blogs per account. If you have multiple blogs, choose a blog that you want to edit from the top-left corner of the admin panel.
Click Posts > All to edit a blog post. Mouse hover a post to get revert to draft, delete and view blog post options. Click on a title to open the corresponding post in editing mode or click on delete to send it to thrash immediately.
Click Stats from the sidebar to monitor your traffic, referring sites, organic keywords, and audience.
Visit the Comments section to approve, delete, and reply to the comments you receive.
Head to the Earnings tab to connect your blog to AdSense and show ads. It is easy to place ads on Blogger blogs. Once connected, Google AdSense will automatically show ads on your posts and pages. It will pay you based on the ad impressions and user clicks.
Pages is another section where you can create an about us, contact, and privacy policy pages.
Visit the Layout tab to customize your blog layout, add widgets, create a favicon, etc.
Click Theme to customize or change your theme and backup and restore the website.
Click Settings to change your blog name, assign a custom domain, and manage other site-wide settings.
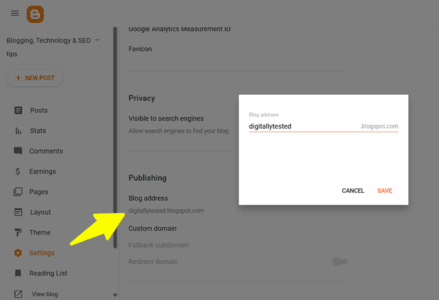
Want to use a custom domain for your Blogger blog? Click ‘Custom domain’ option under your blog address and follow on-screen instructions to set up www.yourwebsite.com for your blog.
You should add two CNAMEs in your domain records to verify your ownership and connect it to the Blogger server. It may take up to 6 hours and after that, your blog visitors will be directed to the custom domain address.
How to Make Money from a Free Blogger Blog
A Blogger blog can do more than share your ideas—it can generate income. There are several ways to monetize your content and turn visitors into earnings.
1. Google AdSense
AdSense is the most popular option to make money from your Blogger blog. Sign up for a free AdSense account and get approved to display ads on your blog. Once people click on them, you will earn money.
Blogger integrates with AdSense, so you can monetize content easily—place ads where they are visible but without affecting user experience. Use responsive options to automatically adjust ad sizes based on user devices.
2. Affiliate Marketing
Promote products or services in your posts. When readers buy through your unique affiliate links, you will earn a commission.
Focus on products that fit your niche. Create review articles, tutorials, or recommendation lists to bring more traffic and boost conversions.
3. Sponsored Posts
Brands may pay you to write posts about their products. However, you should have a decent traffic to get client queries and orders.
Make sure sponsored content fits your audience. Avoid products that you don’y use or trust. Otherwise, it will affect your online trust.
4. Sell Digital Products or Services
Offer eBooks, courses, templates, or freelance services. Add links or buttons so readers can purchase directly from your blog.
Monetising takes time, but even a free Blogger blog can make money blogging. Track performance and adjust strategies to increase your earnings.
Do you have any queries? Let us know through the comment form below.
Read How to Create a Blogger Sitemap and Submit It to Search Engines


Good guide Manoj! Methinks buying a domain is key for credibility.